This is the first time I come across a format called "xpm". Two things on it:
1 what is .xpm format?
X PixMap (XPM) is an image file format used by the X Window System, created in 1989 by Daniel Dardailler and Colas Nahaboo working at Bull Research Center at Sophia Antipolis, France, and later enhanced by Arnaud Le Hors. (from wiki)
2 how to convert general pictures to this format?
using xnconverter.
Mar 13, 2014
Feb 20, 2014
Using WxWidgets 3.0 in Microsoft Visual Studio 2012 or 2013
For the past year I've been caught in experiment, now would swing back to the simulation side. For some reasons, I want to develop a program with a easy-to-use UI. For present, I would use it for my study; for near future, it might be helpful for new comers in this field. After a brief searching on the Qt or WxWidgets, I simply pick up WxWidgets.


The problem is how to use it with Microsoft Visual Studio (2012 or 2013 at present). I went through a tough way in configuring FFTW before(basically it is using DLL in visual studio), so this time I try to find a way as easy as possible that people like me who is not coder but have to code could follow.
And here it is.
- Install the Microsoft Visual Studio 2013 (any edition works for you, or 2012), just click and go.
2. Download and install the WxWidgets 3.0.0. (present it's Version 3.0.0 and windows installer edition is recommended). As recommended in the documentation, install it without space in the path name, so I simply use the default: "C:\wxWidgets-3.0.0".
3. Open the Advanced System Settings(see screenshot) and click on the "Environment Variables...".
4. Add a New item: Variable name: WXWIN, Variable value: C:\wxWidgets-3.0.0 (path of your wxwidgets);
5. Go to your wxWidgets folder (here, for example, C:\wxWidgets-3.0.0), open the "\build\msw\wx_vc10.sln" file with visual studio (just double click on it). If prompted with some update of the files, just hit "OK".
6. Build this solution (hit F7 or from menu) for "Debug" and "Release" separately(choose the build type as shown in the picture, each build process needs may be 1~2 min). (Note: If you need DLL, just build the DLL Debug and DLL Release). It should build without error and show something like"========== Build: 23 succeeded, 0 failed, 0 up-to-date, 0 skipped ==========".
7. Now go to your wxWidgets folder and open "\samples\minimal\minimal.dsw" with visual studio (double click only). Again, if prompted with some update of the files, just hit "OK". Then build it (hit F7, or F5 for debug mode) for debug or release to test it works OK or not. It should build without error pretty quickly and now you have a new folder called "vc_mswud" under "\samples\minimal\vc_mswud", where you would find a setup called "minimal.exe".
8. Double click it to see this setup.
9. When you close the Visual Studio, it will ask you to save the change or not, just click Yes and save it to the same folder. As shown here.
10. Done. Now you can just develop your own code by modify this "minimal" example. But usually, you might want your project in other places, for example, I'd like my project in my Documents folder and there's too many files in present folder. We could copy only those we need to start a new project. After Step 7-9, you may notice that there are several new files generated in the "minimal" folder, among them: minimal.vcxproj, minimal.sln. What we need to copy are these two files and minimal.cpp(or you can write you own .cpp file).
11. Open the .vcxproj with notepad and replace ".\..\.." with "C:\wxWidgets-3.0.0" (where you install your wxWidgets). In my case, I got 28 places replaced.
12. then open the .vcxproj file with Visual Studio (double click only), and delete the sample.rc file (because we don't have it anymore)
13. Hit F5 for debug mode or F7 for build mode and you should see no problem with it. Now you can start you own project now. EXTRA: if you want to change the project name(for example, MyApp), please be sure that you do it this way:
a. change file name: minimal.vcxproj -> MyApp.vcxproj, minimal.sln ->MyApp.sln, minimal.cpp->MyApp.cpp
b. open .vcxproj file with notepad and replace all "minimal" with "MyApp"
c. open .sln file with notepad and replace all "minimal" with "MyApp"
Brief Summary:
With all these mentioned above, the idea is rather simple: After install the WxWidgets, we run the wx_vc10.sln to have it build the necessary library for us, then we can build the sample which is in the "workspace" of wxWidget. If we want to our own project on a different place(workspace), we have to configure the settings to connect to the library, which is saved in the vcxproj file. So we just simply change the path in it to avoid configuring from the scratch.
The above method is derived from various resources, among which the most useful comes from wxWidgets's wiki page,which is little bit out-of-date though.
Dec 13, 2012
Screenshots for configuration of FFTW3 in C++ (Windows)
When you download the zip file from “http://fftw.org/install/windows.html”,

By default, the zip file is like this (I use 64-bit
version):

(notice in this post also have information for debug in case
you find this problem)
Then copy them to the same folder which should looks like:

Here begins the screen shots of configuration:
1 Open the property configuration for present project.
Choose “General” under “C/C++” option tab.

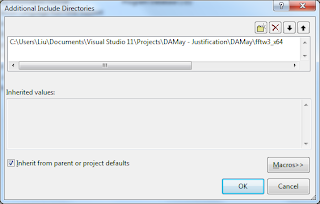
2 add the .dll file’s directory by click “Additional Include
Directories”:
3 under the “Linker/General” option, choose “Additional
Library Directories”

4 add the directory of your .dll file here:

5 add the .lib files’ names under the “Linker/Input” option
here:

6 make sure you’ve input all the .lib files you want to use;

Now you should be able to see the external header file under
“External Dependencies” :

And include it above the other library:

Done.
In my code, I begin to use it like this:

·
You can choose “Optimization for running the
code” to save running time if you don't need debug info.

·
Dec 8, 2012
C++ note (1) 20121208
IDE Integrated Development Environment
Editor
The Compiler
covert source code into object code (.obj)
The Linker
weld everything into an executable whole
The Libraries
a collection of pre-written routines
Standard C++ Library
Microsoft Foundation Classes (MFC)
Windows Forms
Projects and Solutions
A project is a container for all things that make up a program of some kind. All files are stored in the project folder.
Detailed information about the project is stored in an XML file (.vcxproj).
A solution is a mechanism for bringing together all the programs and other resources that represent a solution to a particular data-processing problem. A solution may include several projects or a single project. Usually, a solution has only one project, where usually it has the same name as project, unless otherwise.
.sln -- information about the projects in the solution
.suo -- user options
.sdf -- records data about Intellisense for the solution, which is the facility that provides autocompletion and prompts you for code in the Editor window as you enter it.
.opensdf -- this file exists only while the project is open.
Building the solution
After you building the solution, in case of a Console Application, a few files would be generated:
under solution name folder, a debug sub-folder would be generated
.exe -- program in executable form
.ilk used by the linker when rebuild the project. This avoids the need of relink everything each time you change the program
.pdb -- contains debugging information when execute the program in debug mode
under the project name folder there's another 'debug' folder, too. It has a large number of files that were created during the build process.
Debug and Release version of program
When you create a new project workspace, two versions of the application would be generated.
Debug version -- includes additional information that helps you debug the program
Release version -- no debug information and has the code-optimization options for the compiler.
Shortcuts
F7 -- build the program
Ctrl + F5 -- execute the program
Create an Empty Console Project
stdafx.h -- head file being created in an default Win32 Console Application. This is a mechanism for making the compilation process more efficient when there are lots of files in a program.
By default, the project options will be set to use Unicode libraries, which makes use of a non-standard name for the main function in the program. In order to use standard native C++ in your console programs, you need to switch off the use of Unicode libraries.( Project -> Properties -> Configuration Properties -> General -> Character Set -- 'Not Set' ).
_tmain -- is defined to be either 'main' or 'wmain' (in the header tchar.h), depending on whether or not the program is defined to be to use Unicode characters. In standard of C++/IEC programs start execution in a function called main(), so you need to change the Character Set property value for native C++ to Not Set.
Create a CLR Console Project
After you create a CLR console project, there are no options for a CLR project.
A couple of files in the virtual Resource Files folder:
.ico -- stores an icon for the application that is displayed when the program is minimized
.rc -- records the resources for the application
AssemblyInfo.cpp -- an assembly consists of code and resources that forms a functional unit. Every CLR program consists of one or more assemblies. an assembly is a fundamental building block in all CLR programs.
Jul 4, 2012
Master Thesis Revise Log
2012-7-4 Chp3 by Takayama
General comments:
Delete most of coordinate conjunctions, such as However, ....
Caption of figures is too poor. More explanation is reqyuired.
●This chapter should begin as
"The KEK Digital Accelerator consists of ........."
●Requirement of the chopper is not related to saturation of the
induction cells.
●We don't call "Einzel lens chopper" to distinguish from the
conventional one.
●Explanation of LEBT is too poor.
●Beta function and Dispersion function should be unfamiliar to TokyoTech
staffs. You need to put some explanation for them.
●What is the under curve in Figure 3.14? Figure 3.13 and 14 can be
combined.
●Limitation of the present induction acceleration system should be
correctly classified.
(1) Volatage
1-1 DC voltage (you describe)
1-2 Maximum output voltage
(2) Pulse length (from voltage droop)
(3) Rep-rate
●Figure 3.24 is deleted.
Ken Takayama
Subscribe to:
Posts (Atom)