Dec 1, 2016

A "Hello World" example with Visual Studio Code and Java

Yes, I just got my new 13" Macbook Pro (Oct 18, with Fn keys, of course). It has been more than 10 years since I replaced my iBook G4 with a Dell :( --Don't make me wrong, I love windows:)

It is a great time nowadays with cross-platform programming become easier and easier. I don't use VS code, or Visual Studio Code very often. I love its simplicity. For this reason, I install it on the Mac and begin to play with it. This time, in Java. Why Java?Well, it just happens like that.

So let's begin with a simple "Hello World" example.

Outline:
- Download VS Code;
- Install JDK (Java Development Kit);
- Test the example.
- Install a Java extension (optional);

(1) Download VS Code from here or google it. 

(2) Install JDK (Java Development Kit) from here(Oracle site).

(3)Test our example.

3-1 From the menu, select "Open..", select a folder where you want to put your file in;

3-2 "New file" to add a file, for example, "example.java" and copy the following code in it:

class hello{
    public static void main( String args[] ) {
    System.out.println("Hello World");
    }
}

 3-3 compile and debug with it.

-From the menu select "View->Integrated Terminal"
-compile the source file, here is "example.java", using "javac"
javac example.java
-run the built class file, here is "hello", using "java"
java  hello
-check the output

3-4 (optional) install a Java extension and how to find java-home path

I am not going to introduce the extension here. But if you need further functionality like auto-completion, you will need such extensions, just search for it. Just in case, you don't know how to set the settings for java configurations, especially for "java-home".

Select the "Code->Preference->User Settings", VS code will show a window with default settings, and new window for your to overwrite the default settings.
add a line call "java.home" (as you are typing, this should appear for you to choose), after that, input the path for your JDK, by default for my mac, it is:

    "java.home": "/Library/Java/JavaVirtualMachines/jdk1.8.0_111.jdk/Contents/Home"

In fact, the problem is, how to find this path for your system on a Mac? Here is a good reference on Stackoverflow. In short, in the Terminal, use 

ls -l 'which java'
and copy the one similar to the above.

Userful links:

VS Code with Java (Japanese): blogs.msdn.microsoft.com/ayatokura/2016/07/05/vscode_java/
Path for java-home: stackoverflow.com/questions/18144660/what-is-path-of-jdk-on-mac


Dec 29, 2014

How to Call Gnuplot from C# (WPF)

Two years ago, I've written a post on how to call gnuplot from C++. It turns out the most viewed post of my posts. If you're missing it, click here.

Now as I am developing an UI for my program, I begin to use C# now. And here the old problem comes back again: how to call gnuplot from C#.

Instead of using Foms of C#, I get used to using WPF. However, as we are talking about the C#, so it should work in both structures.

Here we go -- How to call gnuplot from C#.

I'll skip the basics of C# and assume that you all know how to start a project (here I use desktop WPF) or create a button click event.

1 At you design view, create a button click, all the coding we're going to do is just within this event. So it has the most flexibility for using elsewhere.


2  Preparation. Only two preparation we need: 


a, add " using System.IO;" and "using System.Diagnostics" at the top of the file (as you can see in the previous picture). In WPF, these are not added by default. So don't forget to add them before you procceed.


b. download and copy the gnuplot folder to the location where your setup would be. I recommend download the "gp466-win32.zip" and unzip it then you get a folder named "gnuplot". I put it under the debug folder as shown in this picture. You can put it any where as you like, later in the code we have to specify the location of it.


3 set up a new process and specify the path of gnuplot, using StreamWriter to communicate with gnuplot. I will give three examples here to show the usage.


3.1 Simple case: function plot:


 private void Button_Click(object sender, RoutedEventArgs e)
       {
           Process plotProcess = new Process();
           plotProcess.StartInfo.FileName = @"D:\Project\VisualGnuplot\VisualGnuplot\bin\Debug\gnuplot\bin\gnuplot.exe";
           plotProcess.StartInfo.UseShellExecute = false;
           plotProcess.StartInfo.RedirectStandardInput = true;        
           plotProcess.Start();
           StreamWriter sw = plotProcess.StandardInput;
           String strInputText = "plot sin(x)\n";
           sw.WriteLine(strInputText);
           sw.Flush();
           

      MessageBox.Show("Close the gnuplot Window? " );
      sw.Close();           
      plotProcess.Close();
}
Then debug it. if you click on the button, it should appear like this:


notice that if I added a MessageBox to keep the gnuplot window. If you omit it, there will be only a flash and you can't see anything. Another thing is that here the output terminal for gnuplot is the interactive mode, so it's very convenient for a single plot use. For example, in 3D plot you could change the view with mouse.

3.2 normal case: plot external data file.


here suppose that we have a "3d.txt" file whose content is like (don't forget to include # as comment and blank line for 3D plot in gnuplot! I put this data file under the Debug folder as well, you can see this from previous screenshot):
# X Y Z
0 1 2
0 2 4
0 3 8
0 4 16
0 5 32
1 1 5
1 2 3
1 3 5
1 4 3
1 5 5
2 1 32
2 2 16
2 3 8
2 4 4
2 5 2
3 1 3
3 2 9
3 3 27
3 4 81
I purposedly write only four elements in "3" while for "0" to "2" each of them has five element to indicate that you don't have to have the same shape in 3D line plot.

what we need to do is modify the code sent to gnuplot. Simply as it is:

private void Button_Click(object sender, RoutedEventArgs e)
       {
           Process plotProcess = new Process();
           plotProcess.StartInfo.FileName = @"D:\Project\VisualGnuplot\VisualGnuplot\bin\Debug\gnuplot\bin\gnuplot.exe";
           plotProcess.StartInfo.UseShellExecute = false;
           plotProcess.StartInfo.RedirectStandardInput = true;        
           plotProcess.Start();
           StreamWriter sw = plotProcess.StandardInput;
           //String strInputText = "plot sin(x)\n";
           String strInputText = "splot \"3d.txt\" using 1:2:3 with lines\n";
           sw.WriteLine(strInputText);
           sw.Flush();        
           MessageBox.Show("Close the gnuplot Window? " );
           sw.Close();
           plotProcess.Close();
                  } 

Now the result is:


I think now you have get a sense on how to use it now. Like in the C++ case, we sent all the commands to the gnuplot and let it work. But pratically, we need lots of settings to plot a graph we want, such as colors, labels and legends. Most of the case, we'd like the ability to derectly output the image itself. I think now you should know how to do it. So let's give a simple last example to show how to do it: plot an external data file and output the image.

3.3 plot an external data file and with external plot setting file

suppose we write another file "sp.plt" like this:

set terminal pngset output "plot.png"
splot "3d.txt" using 1:2:3 with lines
and now we read in these commands with StreamReader (not StringReader as I was cheated by the auto correction!)
       private void Button_Click(object sender, RoutedEventArgs e)
       {
           Process plotProcess = new Process();
           plotProcess.StartInfo.FileName = @"D:\Project\VisualGnuplot\VisualGnuplot\bin\Debug\gnuplot\bin\gnuplot.exe";
           plotProcess.StartInfo.UseShellExecute = false;
           plotProcess.StartInfo.RedirectStandardInput = true;        
           plotProcess.Start();
           StreamWriter sw = plotProcess.StandardInput;
           //String strInputText = "plot sin(x)\n";
           //String strInputText = "splot \"3d.txt\" using 1:2:3 with lines\n";
           String strInputText;
           StreamReader sr = new StreamReader("sp.plt");
           strInputText = sr.ReadToEnd();
           sr.Close();
           sw.WriteLine(strInputText);
           sw.Flush();        
          // MessageBox.Show("Close the gnuplot Window? " );
           sw.Close();
           plotProcess.Close();
           }

note that because we output the image, so we don't need the gnuplot window again. This will be handful when we have lots of files to plot. And there should be a png file generated now.
(a window flashed and disappeared)


Summary:


Now we could use the gnuplot from C# in a flexible way. Further thing you might be interested is as following: a. on the designer view design the setting pannel; b, write the setting parameters from the user and save it to a plot setting file; c, plot the data (ouput from code or external ones) to image; d, display the image as you want to the window.

PS. I'm quite busy with my work so I didn't check the comments very often. But you can still leave your comments there that might be helpful for other readers or I will reply to it when I see it.


Nov 17, 2014

C# tip 1: Open a new window with a button click

Finally, I decide to forget about the cross-platform thing and just want to finish my project as soon as possible. Because I mainly use Windows, I turn to C# for the GUI development.  I write my code in C++ with Visual Studio, so it may be easier for me to write C# under the same environment.

Now I'm thinking of building the GUI with C#, the main calculation will still be running in C++. The idea is C# just for the configuration and output of parameter list, which would be imported later in C++ code. All the front end and data processing are built with C#, only the developer touches on the C++  calculation part.

The first tip I eager to learn is how to generate a Window by click a button.
It it rather intuitive in C#.


  • Right click on the project name and select Add -> Window, give your new window a name, say, comEditorWindow.


  •  Drag a button object to the design viewer, name it.


  • In the Properties, click on "Event handler"(thundering mark).


  • At option "Click", input a name for you click, say, "buttonClick" then the Visual Studio would jump right into the method by which you write about what will happen when click the button.


One thing to note is that if you choose "Show( )" instead of "ShowDialog( )", then the user could click on the main window freely, so usually it's recommended to use "ShowDialog( )", or the user might have clicked the button twice and open two same windows. But sometimes both windows might need to be active at the same time, so choose the one that fits your need.


Mar 13, 2014

about XPM

This is the first time I come across a format called "xpm". Two things on it:

1 what is .xpm format?
X PixMap (XPM) is an image file format used by the X Window System, created in 1989 by Daniel Dardailler and Colas Nahaboo working at Bull Research Center at Sophia Antipolis, France, and later enhanced by Arnaud Le Hors. (from wiki)

2 how to convert general pictures to this format?
using xnconverter.

Feb 20, 2014

Using WxWidgets 3.0 in Microsoft Visual Studio 2012 or 2013

For the past year I've been caught in experiment, now would swing back to the simulation side. For some reasons, I want to develop a program with a easy-to-use UI. For present, I would use it for my study; for near future, it might be helpful for new comers in this field. After a brief searching on the Qt or WxWidgets, I simply pick up WxWidgets.

The problem is how to use it with Microsoft Visual Studio (2012 or 2013 at present). I went through a tough way in configuring FFTW before(basically it is using DLL in visual studio), so this time  I try to find a way as easy as possible that people like me who is not coder but have to code could follow.

And here it is.


  1. Install the  Microsoft Visual Studio 2013 (any edition works for you, or 2012), just click and go.

    2. Download and install the WxWidgets 3.0.0. (present it's Version 3.0.0 and windows installer edition is recommended). As recommended in the documentation, install it without space in the path name, so I simply use the default: "C:\wxWidgets-3.0.0".

    3.  Open the Advanced System Settings(see screenshot) and click on the "Environment Variables...".


    4. Add a New item: Variable name: WXWIN, Variable value: C:\wxWidgets-3.0.0 (path of your wxwidgets);


     5.  Go to your wxWidgets folder (here, for example, C:\wxWidgets-3.0.0), open the "\build\msw\wx_vc10.sln" file with visual studio (just double click on it).  If prompted with some update of the files, just hit "OK". 

    6.  Build this solution (hit F7 or from menu) for "Debug" and "Release" separately(choose the build type as shown in the picture, each build process needs may be 1~2 min). (Note: If you need DLL, just build the DLL Debug and DLL Release). It should build without error and show something like"========== Build: 23 succeeded, 0 failed, 0 up-to-date, 0 skipped ==========".


     7.   Now go to your wxWidgets folder and open "\samples\minimal\minimal.dsw" with visual studio (double click only). Again,  if prompted with some update of the files, just hit "OK". Then build it (hit F7, or F5 for debug mode) for debug or release to test it works OK or not. It should build without error pretty quickly and now you have a new folder called "vc_mswud" under "\samples\minimal\vc_mswud", where you would find a setup called "minimal.exe".
     8.  Double click it to see this setup.

     9. When you close the Visual Studio, it will ask you to save the change or not, just click Yes and save it to the same folder. As shown here.


     10.  Done. Now you can just develop your own code by modify this "minimal" example. But usually, you might want your project in other places, for example, I'd like my project in my Documents folder and there's too many files in present folder. We could copy only those we need to start a new project. After Step 7-9, you may notice that there are several new files generated in the "minimal" folder, among them: minimal.vcxproj, minimal.sln. What we need to copy are these two files and minimal.cpp(or you can write you own .cpp file). 

     11. Open the .vcxproj with notepad and replace ".\..\.." with  "C:\wxWidgets-3.0.0" (where you install your wxWidgets). In my case, I got 28 places replaced. 


     12.  then open the .vcxproj file with Visual Studio (double click only), and delete the sample.rc file (because we don't have it anymore)
     13.  Hit F5 for debug mode or F7 for build mode and you should see no problem with it. Now you can start you own project now. EXTRA: if you want to change the project name(for example, MyApp), please be sure that you do it this way:
a. change file name: minimal.vcxproj -> MyApp.vcxproj, minimal.sln ->MyApp.sln, minimal.cpp->MyApp.cpp
b. open .vcxproj file with notepad and replace all "minimal" with "MyApp"
c. open .sln file with notepad and replace all "minimal" with "MyApp"

Brief Summary:
With all these mentioned above, the idea is rather simple: After install the WxWidgets, we run the wx_vc10.sln to have it build the necessary library for us, then we can build the sample which is in the "workspace" of wxWidget. If we want to our own project on a different place(workspace), we have to configure the settings to connect to the library, which is saved in the vcxproj file. So we just simply change the path in it to avoid configuring from the scratch. 

The above method is derived from various resources, among which the most useful comes from wxWidgets's wiki page,which is little bit out-of-date though.


Dec 13, 2012

Screenshots for configuration of FFTW3 in C++ (Windows)


When you download the zip file from “http://fftw.org/install/windows.html”,


By default, the zip file is like this (I use 64-bit version):


First thing you should do is to generate .lib files for these .dll files. Refer to the post here:
(notice in this post also have information for debug in case you find this problem)
Then copy them to the same folder which should looks like:

Copy this folder to your project’s folder (actually you can put it anywhere).
Here begins the screen shots of configuration:

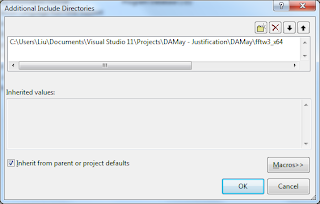
1 Open the property configuration for present project. Choose “General” under “C/C++” option tab.

2 add the .dll file’s directory by click “Additional Include Directories”:

3 under the “Linker/General” option, choose “Additional Library Directories”

4 add the directory of your  .dll file here:

5 add the .lib files’ names under the “Linker/Input” option here:

6 make sure you’ve input all the .lib files you want to use;


Now you should be able to see the external header file under “External Dependencies” :


And include it above the other library:


Done.


In my code, I begin to use it like this:


You should refer to the manual of FFTW3 for the use of it.


·         You can choose “Optimization for running the code” to save running time if you don't need debug info.
·         

Dec 8, 2012

C++ note (1) 20121208

IDE Integrated Development Environment

Editor
The Compiler
    covert source code into object code (.obj)
The Linker
    weld everything into an executable whole
The Libraries
    a collection of pre-written routines
        Standard C++ Library
        Microsoft Foundation Classes (MFC)
        Windows Forms

Projects and Solutions
    A project is a container for all things that make up a program of some kind. All files are stored in the project folder.
    Detailed information about the project is stored in an XML file (.vcxproj).
 
    A solution is a mechanism for bringing together all the programs and other resources that represent a solution to a particular data-processing problem. A solution may include several projects or a single project. Usually, a solution has only one project, where usually it has the same name as project, unless otherwise.
    .sln -- information about the projects in the solution
    .suo -- user options
    .sdf -- records data about Intellisense for the solution, which is the facility that provides autocompletion and prompts you for code in the Editor window as you enter it.
    .opensdf -- this file exists only while the project is open.

Building the solution
After you building the solution, in case of a Console Application, a few files would be generated:
    under solution name folder, a debug sub-folder would be generated
        .exe -- program in executable form
        .ilk used by the linker when rebuild the project. This avoids the need of relink everything each time you change the program
        .pdb -- contains debugging information when execute the program in debug mode
    under the project name folder there's another 'debug' folder, too. It has a large number of files that were created during the build process.

Debug and Release version of program
    When you  create a new project workspace, two versions of the application would be generated.
    Debug version -- includes additional information that helps you debug the program
    Release version -- no debug information and has the code-optimization options for the compiler.

Shortcuts
    F7 --  build the program
    Ctrl + F5 -- execute the program

Create an Empty Console Project
    stdafx.h -- head file being created in an default Win32 Console Application. This is a mechanism for making the compilation process more efficient when there are lots of files in a program.
    By default, the project options will be set to use Unicode libraries, which makes use of a non-standard name for the main function in the program. In order to use standard native C++ in your console programs, you need to switch off the use of Unicode libraries.( Project -> Properties -> Configuration Properties -> General -> Character Set -- 'Not Set' ).
    _tmain -- is defined to be either 'main' or 'wmain' (in the header tchar.h), depending on whether or not the program is defined to be to use Unicode characters. In standard of C++/IEC programs start execution in a function called main(), so you need to change the Character Set property value for native C++ to Not Set.

Create a CLR Console Project
After you create a CLR console project, there are no options for a CLR project.
A couple of files in the virtual Resource Files folder:
    .ico -- stores an icon for the application that is displayed when the program is minimized
    .rc -- records the resources for the application
AssemblyInfo.cpp -- an assembly consists of code and resources that forms a functional unit. Every CLR program consists of one or more assemblies. an assembly is a fundamental building block in all CLR programs.


Jul 4, 2012

Master Thesis Revise Log

2012-7-4 Chp3 by Takayama

General comments:

Delete most of coordinate conjunctions, such as However, ....
Caption of figures is too poor. More explanation is reqyuired.

●This chapter should begin as

"The KEK Digital Accelerator consists of ........."

●Requirement of the chopper is not related to saturation of the
induction cells.
●We don't call "Einzel lens chopper" to distinguish from the
conventional one.
●Explanation of LEBT is too poor.
●Beta function and Dispersion function should be unfamiliar to TokyoTech
staffs. You need to put some explanation for them.
●What is the under curve in Figure 3.14? Figure 3.13 and 14 can be
combined.
●Limitation of the present induction acceleration system should be
correctly classified.
(1) Volatage
1-1 DC voltage (you describe)
1-2 Maximum output voltage
(2) Pulse length (from voltage droop)
(3) Rep-rate
●Figure 3.24 is deleted.

Ken Takayama

May 31, 2012

What needs to be done for Simulation

1 separate the plot module after the simulation end at t_max or turn_max

2 use OpenMP for parallel computation with omp.h head file

3 calculate the emittance for x-x' and center of x-direction

May 23, 2012

notice the INT_MAX in your code!

no details, but be careful ! If necessary use long long int instead.

May 20, 2012

How to optimize your code in VC++

Last time I have talked about the optimization of the running code but didn't show how to do that. Here it is:


  • open you project's property and change to the C++/C


make sure that "Debug Information Format" is chosen to be "Program Databas(/Zi)

  • change to "Optimization" tab, 

choose Full Optimaization(/Ox) or Maximize Speed(/O2).


  • change to " Code Generation" tab


choose "Default" for "Basic Runtime Checks"

A word of caution, optimization is good for running but the debug information is hard to understand if you're in the process of debugging your code. So this optimization should apply after you find no problems in building and want to run the program for test.

May 17, 2012

array vs vector

Every beginner is struggling doing something that is so simple to others.

Once you know it, you will say to yourself: I did know it should be something simple like this.

Specify the size of array at run-time,dynamically

in C++, sometimes(for me, most of the times), we don't know how long should an array should be. If that is the case, we can do the following:

float *pTable;
int n = 100;
pTable = new float[n];

The point is that one of the common use of pointer is to allocate memory in leap . Then at run-run, you can choose the size based on the need. But once you use new, don't forget to use delete to free the memory.
delete [ ] pTable;

And notice that we also have a STL container called std::array, (include it with #include<array>), it adds useful member functions and iterators to it. So it convenient to use. But still, you need to use pointer to get a run-time specified size of it.
OK, now we see that the built-in array have some drawbacks and even for the std::array we have to specify the size of it with a constant. Why don't we just use vector, which does all the tedious work for us? "I thought for a computation intense program, array is faster than vector," you will think like this as I did. However, this is not true!
Read this link for this answer then you will not waste you time in figuring out those tedious things related to array, just go with vector and finish your work.

Then here is the conclusion: just go with vector


  1. Nearly all of the time, you should choose vector instead of array( built-in or std::array). Spend those saved time in programming.
  2. the vector performs less efficient only when you need change its size frequently(which makes it reallocate the memory). If that's not the case, their performance almost the same.
  3. the compile spends a lot of extra work in range-checking or similar thing in debugging. Once you got your program right, you can use a optimized build and right settings (removing the STL debugging).


May 16, 2012

c++ read in file for initialization

two things you should know:

  1. getline read in a single line with "\n" delimiter by default, you can specify the delimiter
  2. >> will automatically skip white space and choose the right type for you

A stardard example

// ini.txt
numberofTest: 100000
kickPerTurn: 20
// code segment
ifstream ini_para("ini_parameters.txt");
if( ini_para.fail() )
cerr <<" failed to open ini_parameters.txt" ;
string dummy_string;
getline(ini_para,dummy_string,':');
         // it's import that you use ':' instead of ":" 
ini_para >> numberofTest;
cout << "numberofTest read as: " << numberofTest <<endl;
getline(ini_para,dummy_string,':');
ini_para >> kickPerTurn;
cout << "kickPerTurn read as: " << kickPerTurn <<endl;
     
        ini_para.close();
A similar discussion could be found example on cplusplus.com.


May 14, 2012

Two things today


  1. Test the micro-bunching structure with momentum modulation
  2. Finish the code implementing the FFT Longitudinal space-charge force